Monday, July 5, 2010

Terminology: Furnace, Forge, Kiln

Just to keep myself from going crazy with these terms, I looked them up to find out which one meant what. According to Merriam-Webster...

A furnace is the most generic term:
 : an enclosed structure in which heat is produced (as for heating a house or for reducing ore)
A kiln narrows the uses to which the heat is put:
 : an oven, furnace, or heated enclosure used for processing a substance by burning, firing, or drying
A forge narrows the thing being heated to a metal:
: a furnace or a shop with its furnace where metal is heated and wrought
So while most of the things I discuss here could use any of these terms,  I'll try to use the term furnace generally. Of course the dictionary only records the current meaning of things, so older texts may contradict.

Monday, June 28, 2010

A few more kindred spirits

Hammered Out Bits continues to provide good iron smelting data at a tremendous rate.

Lee Sauder and Skip Williams have a good page of iron smelting links at The Rockridge Bloomery. (Mel Brooks movie quotations aside)

The Early Mines Research Group has an ongoing smelting effort as well, check out the "experimental archeaology" and members-projects links.

It looks like a lot of different people are (or recently have been) interested in early metal smelting re-creation, and I would love it if whoever catches the bug next had an easier time finding resources than I did, so please: send me your references.

Sunday, June 27, 2010

Kindred Spirits

Some other folks are thinking along the same lines here, and I wanted to put up some links to their work as well.

GrendelFish aka Matthew Dockrey recorded a couple of copper smelting expirments (experiment 1experiment 2)

Tim Young at GeoArch has been running experiments and recording data for a succession of iron smelting efforts from 1998 through 2007.

Paul French is starting a wikipedia entry that looks very promising.

Butser Ancient Farm has their 2010 workshops posted, and Making Metals with Fergus Milton on August 14 looks pretty interesting.

See something else that needs to be on this list? Let me know!

Thursday, June 17, 2010

Think like an engineer: Cheat!

Faced with several smelting failures, I decided to apply one of the sacred tenets of practical engineering taught to me by my father: "When it won't work, cheat". I swapped out the clay forge for one made of loose-stacked firebricks, solving my spalling and insulation problems at a single blow. I was confident charcoal with forced air could get me the temperature I needed if I got a working geometry for the forge. Here's what I ended up with:

[edit post to add picture here]

Additionally a more knowledgeable copper smelter from the other side of the Atlantic Ocean, gave me some good advice about how to test for what was going wrong. (Thank you Fergus!) Armed with this information, and general his encouragement, I took another shot.

On Wednesday, 16 Jun, 2010, I completed my first copper smelt. Here's a short (and very self-important) video of the results.

I plan to do another smelt tomorrow, on a slightly larger scale, so I'll take pictures and video, and post them.

Tuesday, June 1, 2010

Stack furnace v1.0: high firing

Not to ruin the ending for you, but this is where stack furnace 1.0 started to go south. The previous day I had run two wood fires through to burnout in the forge, with no ill effects. Today I planned to do charcoal and forced air. While I had purchased bellows for this purpose, an acquaintance suggested that I just get a heat gun and some dryer duct from the hardware store, and start with that. Being short on time before my trip, I decided to go the surer route, and bought the gear.


The setup turned out to be quite easy. I loaded the furnace to the brim with charcoal, lit the pile from the bottom, used a wooden wedge to keep the duct in the tuyere, and sat down to watch, periodically removing the vent to reload the charcoal.

At the beginning of the first reload, I began to hear a curious sound, a lot like popcorn popping. Those more knowledgeable readers will be wincing right now, but after checking that there were no cracks or faults developing, I assumed it was some impurity in the charcoal and blithely continued. The next odd symptom was that the ash didn't seem to be burning as completely. There was a large accumulation of unburned crap in the bottom of the forge, and it continued to grow as I fed more charcoal into it.

The third symptom was clear, however: the edges of the tuyere cracked and widened it to about 200% (and later 300%) of its original size, causing the duct to drop out. At this point, with the better view into the forge afforded by the (now quite large) tuyere, I could see that the accumulation of "ash" was actually an accumulation of spalled clay. The popping noises were caused by fire-hardened clay cracking off as less hard (and still wet) clay behind it generated steam and popped it off.

The clay body was still too wet, and I was eroding my forge from the inside out. Below are some pictures of the whole thing, the inside, and a close up of one "edge" of the tuyere


Well, I was ready for my vacation anyway :)

Stack furnace v1.0: low firing

After three days of drying indoors, then getting a good friend to help me get this back onto the patio, I split up some firewood into kindling sticks for the first (low) firing:


My current plan is to build a small fire inside the forge using just some kindling, and let that burn out. When that's cooled a bit, I'll start a second woodfire using logs, and let that burn for a while. A simple wood fire with no forced air isn't going to vitrify the clay, so this is an exercise in driving off water. Again, I can't find much in the way of advice on how to dry thick hunks of clay, so I'm flying blind.

Yes, it's on fire, but you can't really see it because the sun was quite bright that day.


Burn 1 went to completion without a hitch: no spalling of the clay at all, and a nice hard surface resulted on the inside. Round two, with the bigger logs, begins.


This also went well, although it took a lot longer than I'd hoped. To keep the fire "in" the forge, I had to keep chopping away at the lower parts of the wood to get them out of the way so the fresh (burning) wood was below the top.


As you can see, the second firing went well. There was either a little spalling, or there wasn't any, and I just cleaved off some loose ash/clay when cleaning the coals, but either way, there are no cracks or major cleaves, so I'm ready to move on to the High Firing!

Stack furnace v1.0: The claywork

Now based on several articles, videos, and some photos found online, I've decided to build what I think should be termed a clay stack furnace. I will create a small pocket of high temperature surrounded by reflective (or at least insulative) material. Thus the heat energy will stay trapped in that area, rather than leaving via the flue/chimney.

Shopping for high-cone clay turned out to be the hardest part. I knew I was going to be pushing all sorts of temperature boundaries in the pocket, so I didn't want to mess with something that would melt, slag, or droop below that. Unfortunately, my local bigbox stores, craft stores, and even school supply stores didn't carry anything beyond air- or oven- dry clay. I went to a couple of the boutique paint-your-own pottery places, and although they sometimes sell clay, they had none. Even the specialist art supply place on the edge of town only occasionally carried pottery clay, and that was neither high-cone nor in stock. Much gas wasted driving around, so I returned home and started calling around.

In fact the nearest place that was open and selling cone-10 clay was the student store at a college about an hour's drive out of town. Happily, they were dumping their stock at the end of the semester, and had 35-40 kilos at "sub cost" prices. Whee!

OK, so now I have clay, but I'm no potter, so I have no idea what I'm doing as far as construction, drying time, firing time/temp, etc. A quick browse through the internet does not reveal much in the way of "how long do you let a 5cm thick wall of clay dry before you fire it?". Most of the instructions are for dainty little teacups or objets d'art. The five large cubes of clay made me bold, and I decided to just forge ahead. (No pun intended)

First layer
Second layer
Third Layer
Fourth and fifth layers
Inside view, after smoothing

Basically I started with a tight little horseshoe shape, built on that, then closed the tuyere at the top, and built it up a bit taller.

When I was done, I realized that I had expanded the internal volume considerably beyond what I had originally intended, so I sliced (vertically) a couple of chunks out of the sides, dampened the edges, and stuck them back together firmly. While I fully expected this to result in faults during firing, this did not happen: apparently working the edges enough resulted in a good "weld". The removed clay I placed on top again, making the stack still taller.

Finally I wet my hands a bit, and smoothed and compressed all the surfaces. Yes, smooth is a relative term, but I reasoned that reducing the surface area would increase heat reflection and decrease heat absorption. Likewise, the opportunity to compress the sides together would hopefully knead out any larger air pockets. This was by far the quickest part of the build.

So now I have this... er... thing. I know it's got a lot of water content: I didn't add water to the clay out of the box, but it was still pliable, so its water content was not zero, and I did wet my hands for the smoothing effort, and the clay drank that water in.

Looking up drying times on the web, I get a variety of answers: from 36 hours in Arizona to ten days in Minnesota. Since I'm leaving on a trip in four days (on April 28) I decide to try for three days. Moving this (base + forge) off my patio and into the relative dry of my apartment was a big job, and bringing it out again was going to be another one. Happily, family and friends were understanding enough to help.

New platform for builds

In the previous post, I wondered about building a forgelet inside my chiminea. After evaluating some of the dimensions involved, I thought this would be a problem, given the limiting size of the "mouth".


So I decided to take a different route. One sunny day in mid-April saw me on another building spree: No matter what I eventually designed, I was going to need to build it somewhere, and a platform of some sort would be needed. A standing garden firepit kit, sand, and firebricks formed the base. A full sized fire extinguisher bottle was also called for.


Fireproof, sturdy, and good defense against high temperatures.

Onwards!

Sunday, April 18, 2010

Added a page

Check out the "Cold Forge Resources" page.

Thursday, April 15, 2010

Core problem: low temperature

The news turned out to be bad-ish. After another trial where I severely limited the available oxygen, it appears the core forge temperature was only getting up to 1000-1050C: not *quite* enough to smelt the copper. I've got two ideas for dealing with this:

  1. Improve (radically) the airflow, and use more fuel. More combustion in less time == higher temp. Maybe a hair dryer or something to keep the air full-blast full-time.
  2. Build a smaller, "forge" within the chiminea. Perhaps something more historically accurate will keep more heat in a smaller volume and raise the working temperature.
Not sure which way I'll go yet. I think #2 would be more satisfying, but I can probably implement #1 in a single day.

-Jeff

Sunday, April 11, 2010

Which way now?

In diagnosing my previous problem, I know that an insufficiently reducing environment will yield copper oxides rather than copper metal. Unfortunately, insufficient heat will yield exactly the same thing, so that doesn't help. However, if the problem is low temperature, then it's going to be a real issue. Too much oxygen, on the other hand, is relatively easy to solve, so I'll start with that.

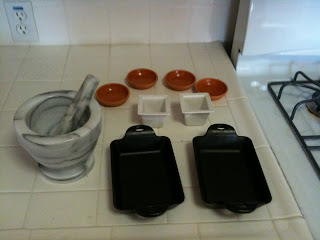
I took the copper oxides from smelts 1 & 2 and crushed them in a mortar and pestle. This yielded somewhat-fine oxide powder, which I put into the terracotta saucers


Now I plan to get a little extra clay, and seal the saucers together, top and bottom leaving a small hole for a little gaseous expansion, mix in a little charcoal dust to absorb any low-hanging fruit on the oxygen tree, and fire up the forge once again.

Hopefully, these little saucers will be half-filled with circular copper ingots at the end of the process

Wish me luck!

Past efforts: Smelt 2, partial success

I wanted to compare the various containers, so I tried some open to the flame (cast iron servers, 1 terracotta cup) and some closed (2 clamshelled cups, 2 stacked ramekins)

I put them in the bottom of the forge, and piled in the charcoal.

Each container had a mix of large chunks of broken malachite and ground charcoal. I lit the fire and started a'blowin. I reloaded the fuel several times, eventually using the entire bag of charcoal. Once the entire thing had burned down to a bit of ash and a few glowing coals, I extracted the various containers. The cast iron server looked like this. (the circle on the right is the open terracotta saucer)

Safety tip: beware hidden coals... as I started to empty this (by hand, the cast iron was cool enough to touch) I found this guy hiding in the ash...

Ipicked out the larger chunks more gingerly, and ended up with the same result: a lot of ash-looking stuff, and no pooled copper in the bottom of any of the containers. Then I started noticing a terracotta-colored brittle substance at the bottom of each of the containers. It was fragile and brittle, but not charcoal, and it was present in all the containers, so it wasn't shards of pottery.

I decided that it must be partly red copper oxide (Cu2O) encased in black copper oxide (CuO), which looked a lot like little chunks of charcoal. This meant that I'd partially reduced the malachite, but didn't actually get to a liquid copper state.

But now I was faced with a problem: I had copper oxide chunks and charcoal that both looked like small black brittle lumps. How could I separate them? After spending 5 minutes teasing them apart and sorting them visually (the charcoal always had striations in the surface) the "idea" light over my head started glowing weakly. Carbon floats, ash is partly soluble, and copper oxides are insoluble. Enter the sophisticated scientific apparatus known as "a glass of water":


After fishing out the charcoal lumps from the froth, and draining and refilling the glass several times (being careful not to tip out any copper from the bottom) I ended up with the copper oxide "lode" at the bottom of the glass. The black lumps are not charcoal nibs, they're black-jacketed copper oxide.

Remembering my leftover "ash" from smelt #1, I emptied that into the glass as well. Presto, more copper. I hadn't made it vanish after all.


I emptied them onto a paper grocery bag to dry:


After examining them for a bit, and comping to the conclusion that the problem had been a overabundance of oxygen, I decided the next step was to put the oxides back into the forge, heat it up, and do my best to make sure that the fire was hot enough to reduce the oxide, and make sure that there was a dearth of oxygen in the containers.

Side note: The Revol ceramics unsurprisingly didn't hold up. Apparently it was too hot for them: the glaze on one cracked, and the other actually broke in the fire, presumably from exceeding its design parameters by 800-900 degrees. :)


Onward to smelt #3!

Past efforts: Crucible needed

When I got no obvious copper from the first smelt, I decided it would be a good idea to get something more stable in which to hold the ore while it was in the coals. Obviously, this would be a high-temperature reactive environment, so regular glass or metal cooking stuff might not cut it.

My first stop was at Doit Center, where I found some very small terracotta flower pot saucers about 3" across and 1/2" deep. For 89 cents, they'd be my first try. Then I went far upscale, a specialty store called Sur La Table, which has all kinds of interesting kitchenware, including small cast-iron serving dishes and a kind of ceramicware called Revol which claims on its website to have a silica glaze and be fired in the 1300C range. I bought two of the cast-iron servers, and two small ramekins from Revol. There was also a marble mortar-and-pestle that was calling to me from the corner of the store, begging to be brought home. What was I supposed to do, ignore it?

Here's the jazz I got:


Past efforts: Smelt 1, making copper vanish

In the morning, with the forge *cough* chiminea *cough* set up, charcoal and blowpipe at the ready, I set up a small pile of lump charcoal, inserted the cone with some of the dust, and lit the coals. Using the blowpipe took a little practice, and I couldn't keep a 100% duty cycle for the hour-plus it took for the charcoal to burn down, but it did seem to make a difference. Still before noon, the charcoal had burned away, and left ash and assorted rubbish in the bottom of the chiminea. The cone had tipped a bit, so I wasn't too shocked when it didn't contain a little lump of copper at the bottom. I carefully shoveled out all the ash, and started sifting through it. The problem was, I didn't really know what I was looking for: I expected to find a little solidified button or puddle of copper, either on the bottom of the forge or in the cone. Nope. Clearly I was a more powerful alchemist than I had realized: I had caused the substance to disappear entirely! :)

I assumed that the copper had done one of two things: broken down into prills so small I didn't recognize them, or literally floated away in the breeze as either vapor or very hot micro-prills. Nevertheless, I set aside all the ash from the bottom of the forge and kept it for later.

Past efforts: Paleosmelting equipment for my apartment

I briefly considered going the "easy" route and buying a commercial small-scale gas-fired smelting furnace, but with my base goal of recreating the tech of the time, I decided to go a more simple route. My apartment complex allows barbecues on the patios, and I decided to get a small terracotta chiminea and burn some charcoal in it. Home Depot sells them, a little bigger than I had wanted, but they were in stock and I was wanted to get started, so I bought it.


On the way home, I remembered (doh!) that I would need some lump charcoal to burn in it. I could use regular firewood, or briquettes, but lump charcoal was probably The Right Thing. Happily, Barbeques Galore had lump hardwood charcoal for sale at a reasonable price, and I bought a couple bags. Surprisingly, neither Home Depot nor the BBQ store sold bellows. A short length of copper pipe with a flange would do for a blowpipe until I could get a proper bellows.

So now I have the makings of a forge, but no ore. Sigh. I go off to the local rock shop and buy a half dozen nuggets of malachite for $3 each, and I'm on my way. It's not very economical, but at least I can get started.

I got the stuff home and unpacked it. (note to self: lugging a boxed chiminea from your car through your apartment to the patio counts as exercise!) Getting it all set up took the remainder of the afternoon.

Actual smelting would wait for tomorrow, but on a lark, I decided to see what would happen if I just took a flake of malachite and held it in the flame jet of a gas stove. It turns black and gets brittle, but that's about it. For the chemists in the crowd, I think it's partially decarbonizing the carbonate: (CuCO3 → CuO + CO2) but I can't be sure about that. Nevertheless, it was promising: I changed the raw mineral into something else.

Saturday, April 10, 2010

Past efforts: Mineral Acquisition

When I started thinking about trying to smelt copper (the easiest of the 7 ancient metals) I found out that the mineral malachite is (was) the most common source of copper ore in the ancient world. Copper did occasionally occur in elemental form (as raw metal in the ground) but it was rare enough that it was never a staple source.

I typed "buy malachite" into Google, and found a zillion rock shops willing to sell me 20-30mm3 chunks of stabilized, polished malachite for $2-$3 dollars per piece, but no one (in the first 5 pages of results) selling it as a raw ore. Searching on eBay gave the same results: polished collector samples, not ore. I changed the search to "buy rough malachite", "buy copper ore", and a bunch of new suppliers appeared, most of which wanted to sell ton quantities with multi-week delivery latencies (order it from China, they put it on a cargo vessel) with customs work and dockyard pickup.

Between those two scales, I didn't find anything.

Since my personal interests are in recreating the technologies of antiquity, I took a step back, and considered actually mining it myself. I know there are rockhound clubs that go on field trips to gather various minerals, and I've met miners/prospectors who work by themselves on small mineral lodes. If malachite was available (at the surface) in some small quantity, maybe I could go chip it out myself.

So I visited the website of my county's gem and mineral club and got the phone number of Rob, their director of field trips. It turns out that he didn't actually know how to go from a list of minerals (malachite, casserite) to a list of locations/contacts to gather those minerals. Most rock clubs' field trips are organized by members who already know a neat place to pick something up, and they go there, rather than starting with a specific mineral goal in mind and working from there.

I was undaunted. I went to mindat.org (a really REALLY data-rich website about minerals in the US and around the world) and found they had a chat room. When I explained what I was trying to do to the local mineralogists, they were also surprised. Some of them were mineral collectors/gatherers, but they hadn't ever started out with a mineral in mind, and gone through the process of locating and getting permission to gather it. I was getting the odd feeling that this might actually be an uncommon activity. Hrm.

When in doubt, hit Google. That's my philosophy. Google disgorged contact information for the USGS, the Bureau of Land Management, California Mining and Geology Board, etc. I started calling. The reaction was almost universally "You want to do what?" Happily, someone at the department of mines pointed me to John K elsewhere at the department of conservation, and when I left a message for him, he called me back. Our conversation was great.

It turns out that yes, this really is an uncommon goal. [Sweeping generalizations follow] Individual rockhounds are usually location-based, they want to know what they can get in their local area, and they collect that. Mining concerns, in turn, have whole departments dedicated to acquiring mineral rights, and are only interested in larger prospects which make it economical to bring in heavy equipment. Between these two poles, almost no one wants to find a specific mineral and walk away with "a few pounds" of it. John took me to the amazing USGS Mineral Resources Data System, which has a lot of useful information in it about where to find various minerals, but nothing about whether they might be gatherable. That's all up to the reader.

Likewise [more sweeping generalizations] the Bureau of Land Management allows minor mineral collection (no back hoes or explosives, please) on land it manages (you can even stake a claim) but no indication on their maps about where minerals might be found. Aside: being a computer geek, I seriously considered making a crossover database between BLM and USGS, showing the data from both, but given that apparently the entire US market for such a database is 1 person (me) that seemed like a fruitless effort. :)

Lastly John pointed me to a couple of other less formal resources which might have people who would know more, including Friends of Mineralogy,

I thanked John (and do so again, here, publicly: Thank you John!) and went on my way.

I contacted a couple of rock shops here in town, and started chasing down their suppliers, figuring I could track back to where the minerals they showcased were mined, or at least bought rough. This was also a little more challenging than I expected: most of those rocks you see in toy stores or oddity shops have been sold and resold several times in their polished state. Nevertheless, I eventually found a couple of semi-local (Less than 200 miles distant) places which did indeed sell 10- to 50- pound lots of several minerals. Huzzah.

Meet Burminco and Mineral Miners. There are probably lots of  others I don't know about, but happily, suppliers like these do exist. Please, if anyone knows of more such companies, post them here!

Likewise, if you know how to go from "mineral name" to "location and permission to gather" easily, DEFINITELY let me know. Please.

Cheers

Paleotechnology

I have always wondered about how people accomplished the things they did, when they were done for the first time, like: How do you make a metal chisel, when you don't have the metal chisel to chip out the metal ores that you need to make it? How do you make ball bearings before you have the smooth axial motion that they alone give?

I'm hoping to make this blog a record of various things that I've tried in an effort to recreate certain early technologies.